Final Major Project
Assemble My Identity
The first task we had to complete for the FMP was assembling our identity. We resisted our work, written and creative, to gather 10 points that strongly we strongly identify with and that best describe our practice.
I included my development practices that I felt I had connection with like daily journals and mood boards.
I also included practices I discovered when working through stage 2 that I felt I want to research more and enhance, like prop and set design.


I created a Mood Board of all the work I have created stage 2 that I feel best describes me as a practitioner.
This Includes my makeup looks from both photoshoots. The experimental photography techniques, like fish eye lens and photoshop editing.
I test all the work on myself first before putting it onto a model. This process I picked up in stage 2 helps me to be prepared for the real photoshoot and develop ahead of time.

Exploring Themes
When exploring and assembling my identity a common theme appeared, Narrative photography. I chose to research this and create a mood board of the images that interest me in the theme.
When researching images I found there is two sides of narrative photography. Fictional and Non- fiction. I personally have responded to both sides already, Altered states - Fiction, Memento - Non fiction. When completing Altered States my imagination was able to run wild and I had a lot of ideas to play with and experiment. When completing Memento I found Paganism and was very interested to explore further into the beliefs, however there was a little more boundaries as it had to be realistic as well show beliefs and traditions.
With the FMP being more of a practitioner growth and exploration, I feel Fictional storytelling relates to me more and I can put my sci-fi, fantasy twist on the work much more easily.

I then took the work I created and want to develop on and added them to some research images that interest me as a practitioner.
I chose my edited Memento images as I love the editing style I chose for the portraits close ups, I also chose them to show my costume and prop design.
I chose my Altered states images because of the makeup and dramatic emotion coming through he image.
I didn't chose my night time shoot from memento because although some of the images created a story, I felt I didn't have the best quality and technique as I hadn't had chance to develop and refine my techniques in the dark. I could develop this further in my exploration if it comes up as part of my FMP.

Storytelling Research
StoryTelling Through Still Image research
I wanted to research into how you truly get a story into a still image. I could use film to tell a story but just seeing my first Pagan Narrative in Memento and my first dramatic story in Altered states made me reflect onto how still images are just as beneficial to tell a story.
Looking at Ben McKechnie’s post on Digital Photography School I learnt quite a few tips on story telling, so to benefit my work I wanted to summarise what I learnt to allow me to go back and use in my photography.
Small details - Include small details in the frame to add or create their story instead of just creating a portrait.
Variety - Take different image styles of a single situation. Up/down zoomed in and our as well as portraits and wide angle portraits.
Control Entire Frame - Be aware of the entire Frame. Look at new angles, subjects positioning. Include environmental details that create the scene and tell the story.
Plan with a shot list - Notes, in a shot list. Specific shots, angles you might include. Refer back to notes from classes and photography introductions.
Trim and exclude - Be selective - narrow down to the best storytelling photograph.
Emotions - Capture emotions - peoples faces. Body language, natural expressions.
Composition and lighting - create a composition and lighting that benefits the story. Lighting can change the mood and composition can change the focus for the audience.
Narrative Structures - practice with narrative structure, chronological, light change etc
Looking at Pedro Quintela’s blog post about captivating audiences in storytelling I was able to find new tips and tricks to ensure my photography portrays my story professionally and emotionally.
Story telling photography
‘Storytelling photography is an image that captures a moment with tension, inspiration, and emotions. It tells the story of your subject matter without using motion pictures or words. your audience’ (Pedro Quintela, How to Create Storytelling Photography That Will Captivate Your Audience)
Tips I found useful:
-
Visual distractions - must be kept to a minimum - background checked and ensured it is clear and only includes what I need
-
Why? Why am I shooting this photo, why is the model and props in this position. What am I tying to get across in my images.
-
Composition - down forget to move around your model, looking for new angles and placements. Maybe get your model to move to create natural movement shots.
-
Plan - The story - Maybe I write the story broad and add too many details to include in one shot so I narrow it down to be specific. Maybe I write only the details I will include. Either way, the shoots will be planned with the story in mind, referring back to key details, hidden meanings I want to portray.
-
Powerful emotions - Most emotions will come across in the hidden meaning, model facial expressions and dark editing.
-
Reveal - I am revealing everything except the darker hidden meaning that as the audience looks deeper will reveal to themselves.
https://www.sciencedaily.com/releases/2008/04/080414145705.htm
Decision making -
Unconscious activity?
When researching I discovered a website discussing the unconscious decision making mental process. The unconscious decision making may be to prevent your brain overloaded.
This made me think of all the times I felt I made a decision consciously when actually I made it unconsciously.
In a story I know I want to create a character, however, I don't know what hidden meanings I will address. I want to create a character and let the key issues arise by themselves.

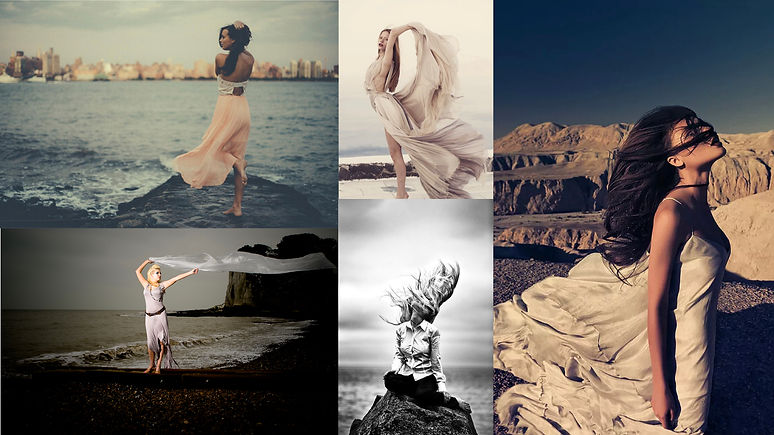
Margarita Kareva
Margarita Kareva is a Russian photographer. Her work is based around fantasy art photography.
She transforms women into fairytale characters. The body positions are interesting and frame the photo. She includes wind, this is something I want to look into using in my images to make the story shine. The wind shows the storm as a moving images that has been simply frozen or captured to document.
FMP Plan
Once I found my theme I decided to brainstorm the key ideas an elements I will use in my FMP. This brainstorm also helped me to answer the questions on my project proposal.
a key element in my project proposal is the timetable. I made a paper version of my timetable to allow me to refer back to when working in my sketchbook.


Technique Experiments
I chose to experiment with techniques I found when researching storytelling photography.
To experiment I will start with in depth research before I complete the practice myself, this allows me to refer back to images and find tips to help me.
Water Photography Research

https://expertphotography.com/milk-bath-photography/
This website gave helpful tips, I listed them below
- Pour milk gradually until desired opaqueness
- You can use milk powder in warm water(make sure it all dissolves
- Safety - warm water to keep model warm
- Dry clothes and floors
- Avoid flowers with dirt, pollen etc
- Natural light for soft shadows

To edit I used photoshop. Focusing on the raw camera filter layer. Allowing colours and texture to be the main edit. I reduced the texture on this image and added hues and vibrancy. The water changed to a glowing blue like the water would look in a fairytale

This was one of the first images I took during the photoshoot. Therefore, my makeup was neat. However, I liked my body position and facial expression so I chose to take it into editing despite the neater makeup. The milk glows in this image, contrasting the grass floating.

My makeup is distressed, allowing a story to shine through. I added water to my mascara to let it run down my face. The milk in the water almost glows. I could have added more to make the water completely white and not let anything be seen through.

To edit this image I used a filter. This filter muted a few colours but left the reds and blues to shine in the lips and eyes. I also added texture to make the image feel rough almost scary. The stare into the camera feels menacing, this is emphasised through the added blue hue.

Editing this image in photoshop I used a filter layer that split the shading into parted sections. I added more levels of colour and vibrancy to make the image pop out. The image was taken upside down so I flipped it 180 degrees to make the image easier to view and understand.
Wind Photography Research
I researched wind photography because I wanted to use it alongside golden hour photography. I researched to see how it looks, however, I would use it subtly and only if I would be lucky to have wind on my shoot.
Golden Hour Photography


Nikola Borissou
Working with lighting combined with movement creates these editorial silhouettes. The shadows from blinds etc, create a contrast with the brightly coloured light pouring through. I like the professional feeling created when all the elements combined to create a single image.
I completed a golden hour photoshoot. Not focusing on costume or makeup, just solely light and shadow as well as body positions.
It was a simple shoot, I did have to plan ahead to make sure I didn't miss the sun before it went behind houses or trees.
There were difficulties using the sun behind the camera. The model couldn't look directly at the camera as the sun was too bright. Therefore, in future shoots, I should adapt body positions and camera angles to allow the model to be comfortable. I also used my phone as I would have missed the particular golden hour. I don't think it affected the photoshoot but the quality of images would be a lot more professional on my camera.


The front of my house faces the sun in the evening allowing me to access a full golden hour. The bench and pants create a perfect set for my shots.
The cat walking into shot really expanded the image, giving it new levels and dimensions.
If I were to do this shoot again I would incorporate more shadows like Borissous' images. I would also use the sky more, the sun catching the clouds or a piercing blue or orange may bring the images all together.
I chose to edit this image using a filter layer. The layer I used was the magazine cutout filter. I like the way it feels fictional, like comic character, however, I wish I could add more shades and depth without altering the look of her face.
The next image I chose to use was one with the legs up on the bench. This shoot allowed me to play with body positions as well as lighting. I like having her legs up on the bench because she looks more natural and relaxed.
To edit this image I used a filter layer again on photoshop. I used a stamp filter. This made it look drawn, created, not photographed. I like the filter, however, I don't feel like it fits. It looks like a drawn story but it removes the brightly coloured sun beams of the golden hour.
LED Lighting
I attended a lighting workshop where we practiced working with LED lights. We worked with panel lighting from behind as well as spotlighting from behind. The contrasts looked really effective and could be something I work with for development for my final piece.

Spotlight panels create a dramatic effect over the model and the background.
We sat the model as if she was in a police investigation.

Spotlights from the front darkened out the background leaving just the front lit up.

Double spotlight panels fro behind light up the edges of the face and create a halo of light. The lighting creates a silhouette of a person and makes shapes emphasised.
Makeup Experimentation
For my storytelling makeup I researched very over the top looks that I could refine down to more editorial photoshoot looks. Eyes being a key feature for the photoshoot allows me to do close up portraits as well as silhouette photography.

I decided to practice with creating exaggerated eyes. Extending them into the face to blend with the contour. This exaggerated eye felt like a fairytale makeup that I can develop and change for different characters. For a more mystical creation I added glitter and gemstones.
I also made an elf ear out of masking tape. Blending it with foundation and bronzer to create the ear folds. I clipped my hair back to cover the join and this added to the look overall.
Blush for me should be over the top because when I think of elves or fairies they always have very blushed cheeks.

Writing My Stories
To begin writing my stories I needed to think of a character. The character I choose will need to have a meaning. Therefore I created character brainstorms for those I connected with the most. This personal connection will help me develop and grow my ideas and personal practice.
Below are some videos that inspire some of my character creation:
Story Brainstorms
My stories will address a key issue for me personally. I let these issues arise unconsciously and when they did I was able to see that they clearly affected me without me knowing.
The idea to include hidden issues came from my initial research into Hansel and Gretel. Hansel and Gretel is based around a famine that hit Europe in 1314. Motherly abandonment and cannibalism feeds the storyline. The story seems innocent but as soon as you read deeper into it you see the issues and terrible origins.
Idea 1


Captains' Story
My captain, strong and independent. Guides us through troubled seas. Fights rivals that come across us. Never shy away from a fight, no matter the size. I trust my captain to look over us and protect us.
Idea 2


Royal Maids' Story
I look out to sea. Endless. If only I could leave to make new friends. A new life. Without money I’m not good enough., talentless, a nothing who works for those who are something.
Idea 3


Fairytale Story
I wear my figure on the outside. Framed by a corset pulled as tight as possible. Unrealistic, that’s how I feel. An imaginary character created by a string and brush. Painted on by those who imagine us.
Location Scouting
Captain
- Oceanic View, cliffs and wind.
- Reculver, Folkestone, Dover.
Dover - Cliffs. Pay to enter. Accessibility is difficult with restrictions and weather.
Reculver - Cliffs, Wind and water view. Free to access. Dangerous edge of cliff, will have to complete Health and Safety checks.
Folkestone - Cliffs and water edge. Quite built up with man made structures.
Chosen Location
Reculver -
This is where I plan on shooting. It has a great access to wind and you can't see anything man made in the background. You also don't need to go too close to the edge to catch the water and sky in the shot together. The lighting here is nice and bright, luckily, because it would be too windy to put up lights that are not weighed down.
Royal Maid
- Oceanic view, castle, ruins. Sky and sea.
- Reculver, Dover
Dover - Large castle and multiple photo settings. Accessibility is difficult with restrictions and is not free to enter.
Reculver - Castle and ruins to frame image. Sea and Sky as well as bright grass.
Chosen Location
Reculver -
This spot uses the ruins to frame the image. The light also sits behind the ruins making the background glow. Turned away from the camera the model will be in contrast light. The shiny material should catch the light at angles.
Fairytale
- Woodland, unrealistic, water (white)
- Local woods, Bath shoot
Local woods - Lots of natural light and bright colours. However, it doesn't look as unrealistic. Will be difficult to achieve edits and framing due to man made structures and people.
Bath - I can fill the bath with milk and water and include flowers etc. The water will create a frame around the body.
Chosen Location
Bath - The white water will allow me to play with floating objects and perspective. The water frames the body like a shell. The water is almost this perfect thing they are trapped into.


Creating Costumes

Captain
I added Gold accents to the shirt to match the gold on the skirt.
The skirt flows with the wind and allows movement to show on the camera.

Royal Maid
The golden fabric symbolises the Royal rules. The white panel symbolises the apron, being a lower class.


Fairytale
The corset pulls tight and the flowers are painted on.
The shear skirt has flower ribbon. The blue flowers will float in the bath and will contrast the white water. The skirt will blend with the water, allowing the corset to be the main focus of the body.


Test Photoshoot


Captain Test Shoot
It went really well. Despite intending to photograph the red skirt to catch the wind I ended up using her hair for movement. I like the close ups and details you can see, like the jewellery and makeup.
During the shoot, the wind was helpful for movement, however, it also made my hand uneasy. Quite a few shots came out blurry and had to be edited to help, despite editing blurry photos are very hard to restore to a better quality. For the final shoot I will definitely book out a tripod to allow me to take clear shots.
With the wind coming from the sea it was very cold. so, to ensure safety we did the shots in bursts to give the model a break and warm up. The wind on a cliffs edge is definitely not a safe mix, for health and safety I felt it was important that we shot from a safe distance from the cliffs edge, this didn't impact the images at all.


Royal Maid Test Shoot
The castle frames the shot really well. The dress glows off the late light. I like the hand clasping the dress and the wind catching the bottom, lifting it away from the body.
I hadn't thought the wind dragging the dress up would show the shoes, so I hadn't planned them. This is ok because they didn't feel too out of place and for most of the shots I can crop them out.
The strings tying the dress are a great representation of the rules tying this character into her place in the story.


Fairytale Test Shoot
I completed this shoot the same way I had experimented. However, instead of flowers I used biodegradable glitter. This added a blue hue to the water and another texture. The glitter had to be biodegradable for safety as it would have gone down the drain and I wouldn't want to damage the ecosystem.
I liked the style of the photoshoot, however, I don't feel like the story shined through like the other photoshoots, at this stage. I do, however, feel after they are edited I will be able to emphasise the unrealistic story and remove rough edges. The elf ears were perfect for the unrealistic feel of the story.
Edits
I chose some of my favourites and edited them. This allowed me to experiment with new techniques and learn more about Lightroom and photoshop.
By experimenting I have found some edits I would like to carry forward into my final piece.

This was a very simple photoshop edit. I added brightness and saturation/vibrance to emphasise colours and glow.
The sky, however, felt dull and plain compared to the other bright colours

I edited this image I my Lightroom workshop. Working with a colour preset that made the image have a green hue. I developed this preset by altering the brightness and exposing the image to reflect the light pouring in from the top right corner.
When shooting the lens picked up a few camera splotches. I edited these out to finish the images.
I felt after editing, I could have been harsher with the dark eyes like my inspiration board. The lipstick stands out but I feel the eyes get lost. When I complete my final shoot I will have my mood-board of inspiration next to me.

After feeling like the sky felt plain I decided to create a layer and add a sunset. This was definitely more interesting than the other sky. I added a pink and red hue to the model. I tried my best to blend the cut backgrounds together. It just stands out as cut, to fix this I feel I need to practice with this technique and get feedback. However, I won't be taking this technique further as I plan to go for my final shoot around sunset to achieve a natural interesting sky.

I created this edit on photoshop. I quick selected the model and created a new layer via the copy. This allowed me to add two more layers of just her. I enlarged the first copy and decreased the opacity. I did the same with the next copy except I enlarged it more than the previous. I also decreased the opacity slightly more to create the fading effect.
Then I simply increased the saturation and added more vibrancy. I think this edit is really impressive and with the models arm position is feels like a hallucination that she is having.


In photoshop I can change the hue of my image, this gave me the idea to add a more blue hue to show the water gloss and the corset. I love how it looks like she is rising from the water or is trapped by the water. It changes the water to look almost like glass. The glass look makes it feel fragile, makes the model feel fragile. The emphasis on the unrealistic meaning of the story shines through, the corset, the makeup and the elf ears.
This was edited on photoshop with the same quick selection as the one above. The copy for this image was enlarged a lot bigger and I decreased the saturation all the way so it became black and white.
It was tricky to check it had worked at first as the blue of the corset comes through so brightly. To check it had worked I just turned off the bottom layer.
I removed a few blemishes on this shoot as the storyline is about being a perfect body image, the white water almost acting as a mould for the perfect figure created by the corset.

Development
After completing my test shoots for all 3 stories I sat and annotated my contact sheets. Just by looking at them I could see that I had to develop some key points for the final shoot.


Planning for Final Shoot
Packing My Camera Bag
It is very important I pack exactly what I need for a photoshoot.
I always start by packing 2 spare batteries I charge the night before. I also pack my bags waterproof cover and the camera's water proof cover, just in case I need them. I always check the weather beforehand and work around the rain but weather can be unpredictable.
Next I pack my lenses. I take a short 50mm lens and then I pack a 50-300mm lens (normally is attached to the camera when I pack it). I also have phone lenses like a fish eye and star lens. I like to use these when the light is hard for my camera or I want to experiment.
After doing my development I learnt that I need a tripod to help keep my hands steady in the wind. Therefore, I went to the camera shop and booked one out for my final shoot.
The weather forecast was mild and I was happy it would be safe winds by the coast. The winds we had when we arrived stayed coming from sea to land the same as the first shoot so it wasn't dragging anything to the edge of the coast

Final Photoshoot
For each final shoot I looked at my development notes. Making sure I develop the areas I wanted to and plan the best ways to achieve this.
I left enough time in my timetable from my proposal that if I needed to do another shoot after this one I can. However, I felt even from the test shoot the images were definitely achieving my Storytelling expectation I had created in my proposal ideas.
Captain Shoot
I recorded a time-lapse to help me reflect on my photoshoot.
I had planned for many elements that could affect us outdoors, for example I had all my waterproof gear. However, I hadn't planned for insects. As soon as I stepped out the car I stepped into a swarm of insects. The were small, but they did show up on camera. When editing I will have to closely look at the images and edit any of them out
- You can see the insects quite clearly in the time-lapse.
I also added more eye makeup after looking back on my research and developing it from the test shoot. I darkened the eyes and added more foundation and blush, still keeping it natural but wind and sun kissed.
Camera - Cannon 5D Mark 2
Chosen lens - 50-300mm


Product Images
When we arrived the sun was setting and reflecting off the ocean.
This glow allowed me to capture a silhouette photo. I loved the outcome of this photo, despite the fact I lose a lot of the details. I can brighten the face a little so you can see more of the details.


The glow from the sea lightens the bottom of the photo making it a gradient.
I really liked the pose and angle of this shot for this particular story. I am a little lower than her, therefore, giving her power and authority.
The details are very clear, the jewellery stands out against the bright background.
I managed to capture the minimal wind we had in her hair movement. The research into wind photography reminded me to make sure her hair was down with minimal product to keep it light and let the wind catch it easily.


Royal Maid
This was shot on the same day as the captain shoot so we had to deal with the bugs.
As this was the second photoshoot of the day the lighting had changed and the wind had picked up.
I kept my camera on automatic because I wanted to shoot quickly and change around within the area. If I was on manual I would had missed all the sunset and golden hour as I would have had to reset my settings for each new angle and costume.
Camera - Cannon 5D Mark 2
Chosen Lens - 50-300mm
Product Images


The sunset (golden hour) reflected off the see creating the perfect longing for more distance shot.
I planned to shoot from the other side but the light reflecting made me change my mind and this led me to capture some beautiful colours.


FairyTale Shoot
Due to the placement in the bath I couldn't capture a time-lapse of this shoot.
I used my phone with lens adaptions to capture a variety of shots.
To begin with I used my normal camera and the contrast blue and yellow colours were the first thing to catch my eye.
This was much more noticeable than the last shoot, I felt it emphasised the unrealistic storyline of the fairytale.
I only added a half pint of milk as I preferred the model fading off into the water. However, even with little milk the face and makeup contrasting with the milk reminds me of Victoria Siemer's work and how the colours are emphasised. I liked the contrast.

The next lens I used was a fish eye clip on lens. This creates a black outline and distorts the image. It creates a zoom effect on the centre of the image. It was really interesting to use with the water. It looked like the model was almost floating out of the water.

Final Photoshoot Edits

Using Lightroom I enhanced the exposure and contest to get a much deeper and emphasised silhouette. The sunset bouncing off the water is warm and contrasts the blue light reflecting off her white top. This difference allows the range of temperatures to be seen easily whilst still creating a dark silhouette.


I used photoshop to increase the texture and clarity of this image. I liked the way it brought out the details of her face and her clothes.
On this image and the images I edited afterwards I added a filter. I used a green hue, creating the sunset and gradient in the background.

This image is edited on photoshop, using an increased contrast and black point.
I liked this edit as it contrasted the bright warm colours in my previous photos.
However, it is very cold compared to images, therefore, I tied it in with a green hue glow around the model, emphasising her silhouette.

To edit both of these images I used photoshop.
I added a yellow tint and increased the vibrance and saturation to create these bright and exaggerated colours.
The difference between the images when editing is, the image on the left looked more like a narrative with added clarity and texture. I tried this in the image on the right but I preferred it better without like a dazed out effect.


Using photoshop I edited this image to have 2 layers on top decreasing in opacity and increasing in size. This created the unrealistic illusion feel.
I could have used more body to show the body standards but I focused on the makeup and skin.
The ears weren't on show but I still liked this image the best because of the face and body position.
Final Piece Display Experimentation
Film
I tried putting some film into premiere pro to edit into a short clip for the story.
I used the Captain clips as an example but I don't think it fits with any of my stories. I thought it might suit the fairytale story, however, during the shoot I didn't get anything I thought I could use.


Projection
I printed my test shoot onto acetate and used a light projector.
I stood next to it for a size reference. I think it being really big on the wall really shows the story and all the details
The wall it is projected on is marked up giving the image a film strip feeling.
I could use a normal projector and edit the image with a similar feel.


Art Steps
Art steps is a virtual space to display work.
I began practicing by placing a pre made exhibition gallery and inserting my images in. It was tricky to add or take away items but with practice it started to get easier
After the practice exhibition I began to think it may be a good way to display a single story in its own room. It would become a virtual experience. Art steps allows you to add sounds, video and a guided tour. This could be used to tell my stories as well as the images, immersing the audience.
Practice Room -
https://www.artsteps.com/embed/ 608a86eb70bd9663f663c7c7/560/315”%20frameborder="0"%20allowfullscreen></iframe>
After testing out the tools etc. I found that despite the fact I can add captains and sound it wasn’t the best way for me to display my stories. This was due to the images being based outside and in water, to be displayed in a room it felt disconnected. I will use it to continue displaying my test work. Therefore, it will become a great inspiration room that I can go back to throughout the project to expand and gather ideas. Almost like a virtual mood board room.

Final Piece and Display

I presented my work using the costume as a back drop.
I mounted my images and burnt the edges. after wards I tea stained the image and bounding the side with twine and anchor buttons. I felt this whole display tied my whole project together. I added my necklace and bracelets to the display to add some gold touches.
I wanted to display the story next to the piece so I tea-stained and burnt some paper and wrote it with a dip ink pen.


To display my maid images I used a projector and a lightbox. For the background behind the lightbox I used my dress and the glow picked up on the material.
To present the story I thought I would write in marker on acetate an hang it behind the lightbox.


Alice in Wonderland 1999
Drink Me Bottle
I thought id research some fairytales to help with my display as I wasn't sure how to present it. From my research I learn about Alice and wonderland syndrome where you imagine and perceive things as altered. I felt that it linked to the body and image perception I was discussing in this project. I took inspiration from the drink me bottle Alice has to drink to fit in with the imaginary surreal world. I took my unrealistic edit and out it in a bottle with lights behind it to make it glow. The cork looks like the inspiration images. To display my story with it I added a tag like the drink me tag used, this added a final touch to the magical fairytale bottle.
